


Looking for touchdown-ready appetizers that’ll have your game-day crowd going wild? These crispy, cheesy bacon cheeseburger bombs are beyond perfect!
Each handheld snack packs all the flavor of a classic cheeseburger into one irresistible bite.
These are the MVP of party snacks. They’ll score big with football fans and foodies alike.
Whip them up, and get ready to become the ultimate game day host!

WANT TO SAVE THIS RECIPE?
Why You’ll Love These Bacon Cheeseburger Bombs
Unforgettable Flavor Explosion: These bites cram loads of classic cheeseburger taste into a compact, easy-to-eat treat. Each one delivers all the savory goodness of beef, cheese, and bacon in one perfect morsel.
Endlessly Customizable: This recipe is easily adaptable to different tastes. Swap cheeses, add spices, or play with the condiments. You can even incorporate extra ingredients like caramelized onions or pickles.
Make-Ahead Friendly: You can prepare these in advance and reheat them. They’re ideal for meal prep, Super Bowl parties, or last-minute gatherings.
Crowd-Pleaser: They’re a terrific choice for picky eaters and family meals. Plus, they're easy to pack on the go!
Ingredients
- Ground Beef: All good burgers (and burger bombs) start with high-quality ground beef. It’s the hearty base that provides flavor, juiciness, and heartiness. Use a ratio of 80/20 for the best flavor.
- Bacon: It adds a smoky, salty, crispy element. It elevates the overall taste profile and provides additional richness. Cook it in the oven for maximum crispness.
- Seasonings: Use a blend of Worcestershire sauce, garlic powder, onion powder, salt, and pepper to make the beef pop.
- Shredded Cheddar: For that traditional cheeseburger melty goodness and taste.
- Ketchup: It adds subtle, sharp, and zesty undertones to complement the meat.
- Mustard: It adds a bit of earthy flavor to contrast the tanginess of the ketchup.
- Refrigerated Biscuits: The crispy, golden exterior that holds the delicious filling. Use whatever brand and flavor you like best. I prefer Pillsbury Buttermilk Biscuits.
- Egg & Water: Combine them to make the egg wash, giving the bombs their beautiful golden-brown shine.
- Parmesan Cheese: An optional but delicious way to finish them off.
How to Make Bacon Cheeseburger Bombs
These little bombs are just as easy to make as they are to enjoy! Just follow these simple steps.
1. PREHEAT the oven to 375°F. Line a baking sheet with parchment paper or a silicone mat.
2. COOK the bacon in a cold skillet over medium heat until crispy, flipping halfway. Transfer to a paper towel-lined plate and set aside.
3. ADD the beef to the skillet and cook, breaking apart with a spatula, for 4-6 minutes until browned. Drain the grease and transfer to a mixing bowl.
4. CRUMBLE the bacon and add to the bowl with Worcestershire sauce, garlic powder, onion powder, salt, pepper, ketchup, and mustard. Mix until combined.
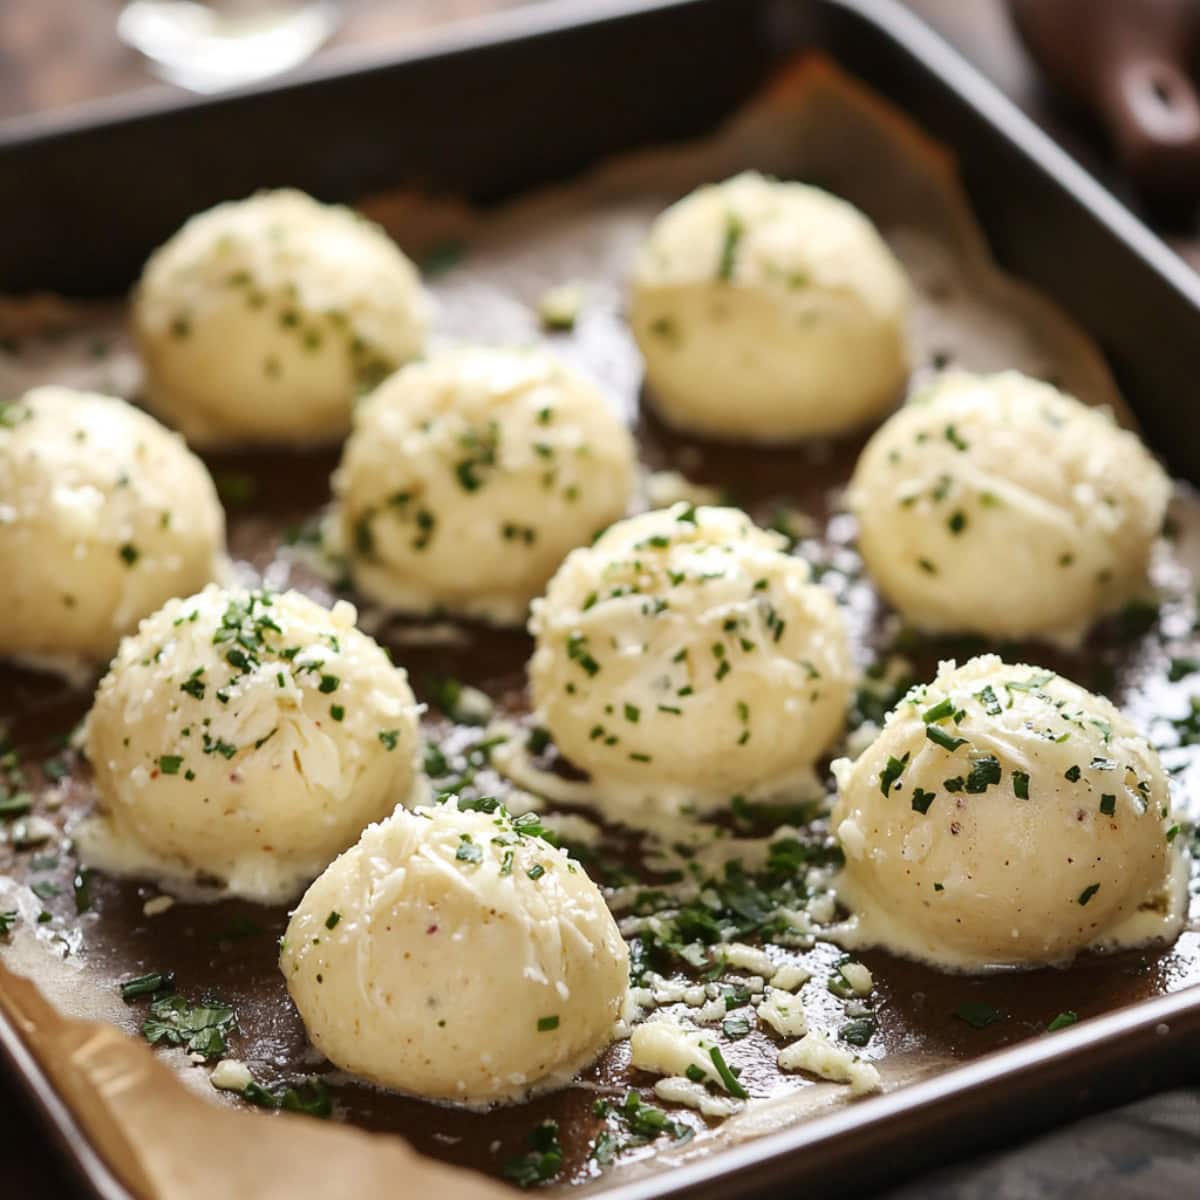
5. ROLL each biscuit into a thin 4-inch circle.
6. DIVIDE the filling evenly between the biscuits, spooning 2-3 tablespoons onto the center of each. PRESS the cheese into the meat so it sticks.
7. FOLD the edges of the dough around the filling. PINCH the seam tightly to seal, shaping into a firm ball.
8. PLACE seam-side down on the baking sheet, leaving 1 inch between each.
9. BRUSH the tops with egg wash and sprinkle with Parmesan, if using.
10. BAKE for 15-20 minutes until golden and puffy, rotating halfway.
11. REST for 5 minutes. SERVE warm with optional toppings or dipping sauces. Enjoy!

Tips for the Best Bacon Cheeseburger Bombs
Ensure these turn out perfectly by incorporating these tips into the recipe:
- Don't skimp on the seasoning. Without it, the filling will be bland. Feel free to play around with the spices, too.
- Skip the bagged stuff. Buy a block of cheese and shred it yourself. (Alternatively, dice it into uniformly sized small cubes.) Avoid packaged shredded or cubed cheeses. They won’t melt as well.
- Fill & seal properly. Add an ample amount of filling, but leave an inch border around the edges. This leaves plenty of room to seal the clean edges around the filling. Seal tightly, pinching the seams. Add a bit of the egg wash, if needed, for a good seal.
- Dial up the flavor. Consider brushing the bacon with barbecue sauce, syrup, or honey mustard before baking. Either will add an extra dimension of flavor.
- Get dipping. Prepare condiments and dipping sauces like Thousand Island, Big Mac sauce, ketchup, or mustard to enhance the flavor.

How to Store
These little guys store wonderfully! You can make them ahead of time and reheat them or keep your leftovers for later.
To Store: Let the bombs cool completely, then refrigerate them in an air-tight container for 3 to 4 days.
To Freeze: For a make-ahead option, prepare and assemble the bombs. Then, freeze them before baking for up to 1 month. Bake straight from frozen, adding a few minutes to the baking time. For already-baked bombs, let them cool completely, then freeze in a storage bag for up to 2 months. Thaw in the fridge overnight before reheating.
To Reheat: Warm chilled bacon cheeseburger bombs in the oven at 350 degrees. They need about 10 minutes to reheat properly.

Bacon Cheeseburger Bombs
These easy bacon cheeseburger bombs are bursting with delicious flavor! The combo of beef, melty cheese, and bacon is totally top-notch.
10
servings40
minutes25
minutes351
kcalIngredients
6-8 slices bacon
1 pound ground beef
1 tablespoon Worcestershire sauce
1/2 teaspoon garlic powder
1/2 teaspoon onion powder
1/2 teaspoon salt
½ teaspoon black pepper
2 tablespoons ketchup
1 tablespoon mustard
2 (5-count) cans refrigerated biscuits
2 cups shredded cheddar
1 egg
1 tablespoon water
1/4 cup freshly grated parmesan cheese, optional
chopped parsley, for garnish
Instructions
- Preheat the oven to 375 degrees Fahrenheit. Line a large baking sheet with parchment paper or a silicone mat.
- Add the bacon to a large, cold skillet. Turn the heat to medium and cook until crispy, flipping halfway. Remove to a paper towel-lined plate and set aside.
- Add the beef to the skillet and cook, breaking it apart with a spatula, for about 4-6 minutes. Once fully browned, carefully drain the grease and transfer the meat to a large mixing bowl.
- Crumble the bacon and add to the bowl with the Worcestershire sauce, garlic powder, onion powder, salt, pepper, ketchup, and mustard. Mix until well combined.
- Lightly dust a clean work surface with flour. Remove the biscuits from the packages and use a rolling pin to flatten each one. Aim for thin circles about 4 inches in diameter.
- Divide the mixture evenly between the biscuits, spooning about 2-3 tablespoons onto the center of each circle. Divide the cheese between each bomb, pressing it gently into the meat so it sticks.
- Carefully fold the edges of the dough around the filling. Pinch the seam tightly to seal, and shape into a firm, round ball.
- Place each ball seam-side-down on the baking sheet, leaving about 1 inch between each.
- Whisk together the egg and water to make an egg wash. Brush the tops of each ball and sprinkle with Parmesan cheese, if using.
- Bake for 15-20 minutes until golden and puffy. Rotate the tray halfway through to ensure even browning.
- Remove from the oven and let rest for 5 minutes. Serve warm with optional garnishes and toppings or sauces for dipping, if desired. Enjoy!
Notes
- For added flavor, brush the bombs with garlic butter before baking. You can also brush the bacon with BBQ sauce, maple syrup, or a honey mustard glaze before baking.
- Use fresh (not bagged) cheese for the best taste and texture.


1 Comments
We really enjoyed these and our little grandkids liked them too. Fun and tasty!