

These easy Valentine’s Day sandwich cookies are the perfect way to show someone you care!
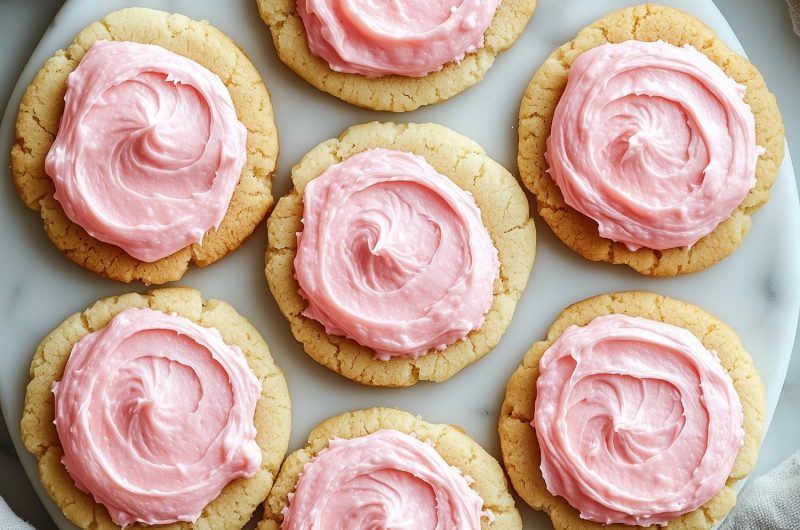
Heart-shaped chocolate cookies are filled with a sweet, pink buttercream frosting and garnished with pretty sprinkles.

WANT TO SAVE THIS RECIPE?
Whether surprising a partner, delighting your kids, or treating yourself, these treats are perfect for celebrating!
From the very first bite, everyone will fall instantly in love.
Why You’ll Love These Valentine’s Day Sandwich Cookies
Cute Design: Heart-shaped cookies with a festive pink filling capture the essence of Valentine’s Day in every bite. Once you add the heart-shaped sprinkles, that’s about as cute as it gets.
Melt-in-Your-Mouth Texture: These cookies are soft and tender with a silky smooth filling. Every mouthful is an incredibly indulgent eating experience.
Versatile Treat: They're not just for Valentine’s Day! These sandwich cookies are delightful year-round. You can use different-shaped cookie cutters and food coloring for other holidays.
Decadently Delicious: Rich, dark chocolate cookies with a luxurious buttercream filling. Seriously, what’s not to love?
Ingredients
- Unsalted Butter: The foundation of tender cookies. Softened butter creates a smooth, even texture. It helps the cookies develop a delicate, melt-in-your-mouth crumb.
- Granulated Sugar: Provides sweetness and helps create the perfect crisp-yet-soft cookie texture.
- Egg: Provides structure and moisture and brings all the ingredients together seamlessly.
- Vanilla Extract: Adds depth and warmth to the cookies, enhancing the overall flavor profile.
- All-Purpose Flour: The structural backbone of the cookie. It helps give them their shape and classic sandwich cookie texture.
- Unsweetened Cocoa Powder: For the intense chocolate flavor and beautiful dark color.
- Baking Powder: Helps the cookies rise slightly and maintain a light, delicate texture.
- Salt: Balances the sweetness and enhances all the other flavors.
- Buttercream Filling: A mix of unsalted butter, powdered sugar, and food coloring. It’s smooth, creamy, and sweet, with a lovely pink hue. Stick to gel food coloring for the most vibrant color.
- Valentine’s Sprinkles (optional): Add a playful, festive touch to make these cookies extra special.

How to Make Valentine’s Day Sandwich Cookies
Like many homemade cookie recipes, this one has several steps. But they’re simple enough that even novice bakers can make them.
1. Make the dough. Beat the butter and sugar until fluffy, then add the egg and vanilla. Whisk the flour, cocoa powder, baking powder, and salt in a separate bowl. Mix well, then slowly add the second mixture to the first until just combined.
2. Chill. Divide the dough into two discs. Wrap each in plastic wrap and chill for 1 to 2 hours.
3. Prepare. When ready to bake, preheat the oven to 350 degrees and line a baking sheet with parchment paper.
4. Cut the cookies. Turn one of the discs onto a floured surface and roll into 1/8- to 1/4-inch thickness. Cut out the heart-shaped cookies. Repeat with the other disc.
5. Bake. Transfer the cookies to the baking sheet and bake for 9 to 10 minutes. Remove from the oven and cool completely.
6. Make the filling. Beat the butter until smooth, then beat in the powdered sugar. Add the food coloring slowly and mix until you reach your desired shade.
7. Assemble. Pipe the filling onto half the cookies, then top with a second cookie.
8. (Optional) Roll the edges of the cookies in sprinkles for a festive decoration.
9. Serve. Enjoy!

Tips for the Best Valentine’s Day Sandwich Cookies
Whether you make these for Valentine’s Day or another holiday, these tips will still apply!
- Let the dough chill. The recipe recommends 1 to 2 hours. However, if that doesn’t seem enough, you can leave it in the fridge longer. Additionally, if the dough starts to soften while working with it, pop it back in the fridge for extra time.
- Dust your cookie cutter. You should always work with cookie dough on a floured surface. However, it also helps to dust your tools with flour, too. Dust the rolling pin while rolling and the cookie cutter when cutting.
- Stick to gel food coloring! Liquid food coloring isn’t as bright and can water down the filling. Gel food coloring works much better, and it usually requires less!
- No piping bag? No problem! Use a sandwich bag with the corner cut off to apply the filling. It’ll work just as well as a real piping bag.
- Don’t overfill! Leave a 1/4-inch border around the cookie edge to prevent overflow when pressing the cookies together. Once you press down on the top one, the filling will expand to reach the edges.
- Don’t wait for the buttercream to harden! Instead, roll them immediately in sprinkles after assembling while it is still wet. This ensures the sprinkles stick perfectly.

How to Store
These cookies are large and quite filling, so you probably won’t eat them all, even if you’re sharing them with your loved ones. Store them properly, though, and they’ll last for days.
To Store: Keep the cookies in an airtight container at room temperature for 6 to 7 days. Place parchment paper between the layers to prevent sticking. And avoid refrigerating them, as that can dry them out.
To Freeze: Place the cookies in freezer-safe bags or containers. Freeze for up to 3 months. Thaw in the fridge overnight or at room temperature for an hour before serving.

Valentine’s Day Sandwich Cookies
These Valentine's Day sandwich cookies are such a special treat! With chocolate cookies and a sweet buttercream filling, you'll fall in love.
12
servings40
minutes10
minutes408
kcalIngredients
- For the Cookies
1 cup (2 sticks) unsalted butter, softened
1 cup granulated sugar
1 medium egg
1 teaspoon pure vanilla extract
2 cups all-purpose flour
3/4 cup unsweetened cocoa powder
1 1/2 teaspoons baking powder
1 teaspoon salt
- For the Filling
1 3/4 sticks unsalted butter, softened
3 1/4 cups powdered sugar
pink gel food coloring
Valentine’s sprinkles (optional, for decoration)
Instructions
- For the Cookies
- In a large mixing bowl, combine the butter and sugar. Beat at medium speed until light and fluffy, 2-3 minutes. Add the egg and vanilla, and beat until well incorporated.
- In a medium bowl, whisk together the flour, cocoa powder, baking powder, and salt. Mix well.
- Slowly add the dry mixture to the creamed butter and sugar mixture. Beat at the lowest speed until the dry ingredients are just incorporated.
- Divide the dough into two equally sized portions and shape into 2 discs. Wrap the discs in plastic wrap and chill for 1-2 hours to make handling easier.
- Once the dough is chilled, preheat the oven to 350 degrees Fahrenheit. Line a baking sheet with parchment paper or a baking mat. Set aside.
- Work with one dough portion at a time. Turn out onto a lightly floured surface and roll to 1/8- to 1/4-inch thickness. Cut out cookies with a heart-shaped cookie cutter and transfer to the prepared baking sheet.
- Bake for 9-10 minutes or until the edges are set and the centers rise slightly. Remove and transfer to a wire rack to cool.
- For the Filling
- While the cookies are cooling, make the filling. Beat the butter until smooth. Gradually add powdered sugar, beating until fully combined and smooth.
- Add the food coloring gradually. Start with 1-2 drops and adjust to reach the desired shade.
- To Assemble
- Once the cookies have cooled completely, pipe the filling onto half of them. Top with the remaining cookies to form a cookie sandwich.
- If desired, roll the edges of each sandwich cookie in Valentine’s sprinkles. Serve and enjoy!
Notes
- Return the dough to the refrigerator if it begins to soften while handling.
- Dust your rolling pin and cookie cutter with flour to prevent sticking.
- If you don’t have a piping bag, use a sandwich bag with the corner clipped off.
- Leave a 1/4-inch border around the cookie edge to prevent the filling from spilling out when closing the cookies.