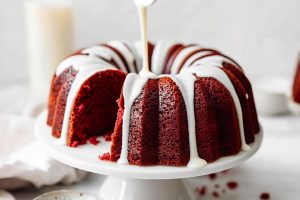
I just pulled this stunning red velvet cake roll out of the fridge, and I can’t stop staring! There’s something so mesmerizing about the perfect spiral of deep red cake wrapped around clouds of cream cheese filling.
The subtle cocoa flavor with a hint of tanginess makes it absolutely irresistible.
This is definitely not your average cake, and everyone will be so impressed by it!
Trust me, it’s worth every minute spent in the kitchen. Now, who’s coming over for a slice?

Why You’ll Love This Red Velvet Cake Roll
Visual Stunner: The dramatic spiral design creates an eye-catching centerpiece that’s perfect for special occasions and holiday gatherings.
Rich and Indulgent Taste: The moist, cocoa-infused cake pairs beautifully with the creamy, tangy cream cheese filling. It creates a decadent and satisfying bite in every slice.
Fun to Make: Rolling the cake adds an interactive element to the baking process. It’s fun for both novice and experienced bakers alike.
Party-Perfect: The roll design allows for easy slicing into elegant, uniform portions that serve 10-12 guests beautifully.
Ingredients
- All-Purpose Flour and Baking Powder: Together, they form the cake’s structure and provide leavening.
- Unsweetened Cocoa Powder: It provides rich chocolate flavor and contributes to the classic red velvet color.
- Salt: It enhances the overall flavor and balances the sweetness in the cake.
- Eggs: They provide structure, moisture, and stability.
- Granulated and Powdered Sugar: Granulated sugar sweetens the cake and contributes to its fine crumb. Powdered sugar is used for dusting.
- Vegetable Oil: It keeps the cake moist and tender, making it easier to roll without cracking.
- Buttermilk: It adds moisture and tanginess, reacting with other ingredients to create a soft, tender crumb.
- Vanilla Extract: It enhances the flavor of the cake and the cream cheese filling with a sweet, aromatic note.
- White Vinegar: It reacts with cocoa powder and baking powder to enhance the red color and contribute to the cake’s tender texture.
- Red Food Coloring: It provides the signature red velvet hue.
- Cream Cheese, Butter, Powdered Sugar, and Vanilla: These ingredients combine to create a rich, tangy, and smooth filling.

How to Make a Red Velvet Cake Roll
This dessert is so stunning, you won’t believe how easy it is to make.
1. Prep the oven. Preheat your oven to 350°F. Grease a 10×15-inch jelly roll pan and line it with parchment paper, leaving a bit of overhang for easy removal.
2. Mix the dry ingredients. In a bowl, whisk together the flour, cocoa powder, baking powder, and salt. Set aside.
3. Beat the eggs and sugar. In a large mixing bowl, beat the eggs with an electric mixer on high speed for 4-5 minutes until thick and pale. Gradually add the sugar and continue beating until fully combined.
4. Add the wet ingredients. Reduce the mixer speed to low and add the oil, buttermilk, vanilla, vinegar, and red food coloring. Mix until smooth.
5. Fold in the dry mix. Gently fold in the dry ingredients using a spatula until just combined. Be careful not to overmix.
6. Bake the cake. Pour the batter into the prepared pan and spread evenly. Tap the pan lightly on the counter to release any air bubbles. Bake for 12-15 minutes or until the cake springs back when lightly touched.
7. Prepare the towel. While the cake bakes, lay a clean kitchen towel flat on a work surface and dust it generously with powdered sugar.
8. Roll the cake. Once the cake is out of the oven, immediately invert it onto the prepared towel. Carefully peel off the parchment paper. Starting from the short end, roll the cake and towel together into a tight spiral. Place the rolled cake on a wire rack to cool completely.
9. Make the filling. In a medium bowl, beat the cream cheese and butter together until smooth and creamy. Add the powdered sugar and vanilla and mix until fluffy. If the mixture feels too thick, add a tablespoon of milk to loosen it slightly.
10. Fill the cake. Once the cake is cool, gently unroll it. Spread the cream cheese filling evenly over the surface, leaving a small border around the edges. Re-roll the cake (without the towel) as tightly as possible. Wrap it in plastic wrap and refrigerate for at least 1 hour to set.
11. Finish and serve. Dust the cake roll with powdered sugar for an extra touch. Slice and serve chilled.

Tips for the Best Red Velvet Cake Roll
This cake roll is so impressive, but I promise, it’s easy to get the hang of!
- Room temperature is a must. Ensure the eggs, cream cheese, and butter are at room temperature for a smoother batter and filling.
- Don’t overmix! When folding in the dry ingredients, mix gently to avoid deflating the batter, which can result in a dense cake.
- Choose your color intensity. You can modify the amount of red food coloring based on your preference for intensity. Gel food coloring works well for vibrant results.
- Don’t overbake! Bake until the cake springs back when lightly touched (12-15 minutes). Overbaking can cause the cake to dry out and crack when rolled.
- Cool completely before filling. Allow the rolled cake to cool fully before adding the cream cheese filling to avoid melting or tearing.
- Chill before slicing. After filling and re-rolling, refrigerate the cake for at least an hour to set it, making it easier to slice cleanly.
- Try tasty variations. Add cocoa nibs or mini chocolate chips to the cream cheese filling for extra texture. Or drizzle melted chocolate on top for added decoration.

How to Store
To keep your leftover cake roll fresh, follow these simple steps.
To Store: Wrap the red velvet cake roll tightly in plastic wrap (double layer recommended) and store in the refrigerator for up to 5 days. Let it sit at room temperature for a few minutes before serving for the best texture.
To Freeze: Double wrap the cake roll in plastic wrap (or use one layer of plastic wrap and one layer of foil) and freeze for up to 2-3 months. Thaw overnight in the refrigerator before serving, or slice directly from frozen and let pieces stand at room temperature for 20 minutes before serving.
More Red Velvet Desserts You’ll Love
Red Velvet Brownies with Cream Cheese Frosting
Red Velvet Bars with Cream Cheese Frosting
Red Velvet Whoopie Pies
Red Velvet White Chocolate Chip Cookies


